
Monday, February 28, 2011
Meka Robotics M1 Mobile Manipulator
Meka M1 Mobile Manipulator vimeo from Meka Robotics on Vimeo.
This video is from here:
http://spectrum.ieee.org/automaton/robotics/humanoids/meka-robotics-announces-mobile-manipulator-with-kinect-and-ros
Cool looking robot.
Wednesday, February 23, 2011
RoboEarth
http://www.roboearth.org/
Cool stuff. A little scary. They have a number of documents about their work that appear interesting.
Cool stuff. A little scary. They have a number of documents about their work that appear interesting.
Monday, February 21, 2011
The Meaning of Symbols in Problem Solving
The following is taken from here: http://robots.open.ac.uk/minicourse/
Another great problem in robotics is getting them to understand language. This is very important in problem-solving. For example, the four cards below have a letter on one side and a number on the other. If a card has a vowel (a, e, i, o, u) on one side then it has an even number on the other. Which cards do you have to turn over to see if this is true? Think about your answer, then point to a card to turn it over.
Now consider the following cards where the rule is ‘every time I go to Paris I go by plane’. Which cards have to be turned over to test this? Again, think about your answer before turning the card over.
The answer to the first question is that you have to turn over the E to see if it has an even number on the back and you have to turn over the 7 to check that it does not have a vowel on the back. In an experiment, only 12% of people got this second part right (did you?).
The answer to the second question is much easier. Of course you have to turn over the Paris card to check that it has the word plane on the back, but now it’s much more obvious that you have to turn over the train card to make sure it does not have Paris on the back. In the experiment mentioned above, 60% of people got the second part right.
These problems are logically the same, so the experimenters drew the conclusion that the meaning of the symbols is an important part of problem solving. Since robots have very poor language capabilities, their ability to use this kind of reasoning is very limited.
Another great problem in robotics is getting them to understand language. This is very important in problem-solving. For example, the four cards below have a letter on one side and a number on the other. If a card has a vowel (a, e, i, o, u) on one side then it has an even number on the other. Which cards do you have to turn over to see if this is true? Think about your answer, then point to a card to turn it over.
 |  |  |  |
 |  |  |  |
The answer to the second question is much easier. Of course you have to turn over the Paris card to check that it has the word plane on the back, but now it’s much more obvious that you have to turn over the train card to make sure it does not have Paris on the back. In the experiment mentioned above, 60% of people got the second part right.
These problems are logically the same, so the experimenters drew the conclusion that the meaning of the symbols is an important part of problem solving. Since robots have very poor language capabilities, their ability to use this kind of reasoning is very limited.
Thursday, February 17, 2011
Using the Finite State Machine Design Pattern in LabVIEW to Implement the xkcd 90s Flowchart
There are a number of really great flowcharts from xkcd, I chose this one to implement in LabVIEW as an example of using the Finite State Machine Design Pattern:

Implementation Notes:
First, create a new VI from template and select the Standard State Machine:

This gets you started with a template VI:

Then implement the flowchart as a Finite State Machine. Note that the end VI is a bit hard to visualize based on the nature of the Case structure, here are some screen shots that show each of the cases followed by some screen shots of the front panel at different states.
First initialize and give the user a message that the test is starting.
 Then ask the user if it is the 90s. If yes continue to 'State 2', if no go to state 'Stop'.
 If it is the 90s the program gets to 'State 2'. Now ask the user to choose between MC Hammer (MCH) and Vanilla Ice (ICE). Then return the string associated with the user choice and advance to the 'Stop' state.
 Stop the program.

Here are example screen shots of the program:


Implementation Notes:
- I am assuming an implied program stop after 'hammertime' and 'listen'.
- The 'Stop' after 'No' is a stop of the program.
- The 'Stop' after 'Yes' is a sub string of the program output (surrounded by matching parenthesis in order to avoid tension).
- I have added a decision after the data flow 'Yes'->'Stop' to select either 'MCH' (MC Hammer) or 'ICE' (Vanilla Ice) which then determines which string the program returns.
First, create a new VI from template and select the Standard State Machine:
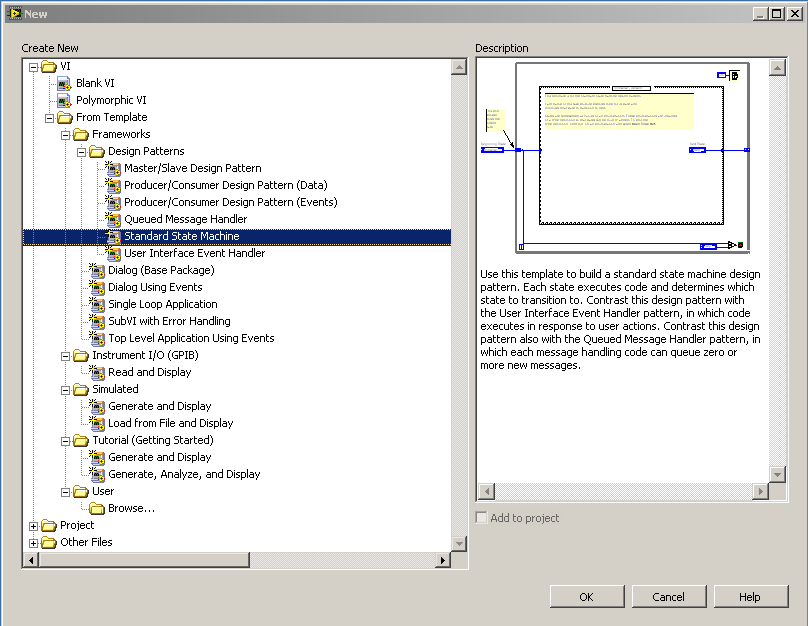
This gets you started with a template VI:

Then implement the flowchart as a Finite State Machine. Note that the end VI is a bit hard to visualize based on the nature of the Case structure, here are some screen shots that show each of the cases followed by some screen shots of the front panel at different states.
First initialize and give the user a message that the test is starting.


Here are example screen shots of the program:
Tuesday, February 15, 2011
Sense, Think, Act for Unmanned Robotic System
http://zone.ni.com/wv/app/doc/p/id/wv-1646
"Sense. Think. Act." Is a traditional model in robotics, this is a nice explanation about its implementation in LabVIEW.
"Sense. Think. Act." Is a traditional model in robotics, this is a nice explanation about its implementation in LabVIEW.
Friday, February 11, 2011
Embedding Weka in a Java Application
Discovered a book, Practical Artificial Intelligence Programming in Java, from here:
http://www.markwatson.com/. Lots of good stuff in this, but the bit that really got my attention was how easy and clean the explanation was for how to embed Weka into a Java application.
If you are not familiar with Weka, I highly recommend that you go here to learn more about it: http://www.cs.waikato.ac.nz/ml/weka/
In summary, the steps to use and modify the example were as follows:
Here is a screen shot of adding weka.jar to the project:

Here is the Java code (modified only slightly from the example referenced above):
import weka.classifiers.meta.FilteredClassifier;
import weka.classifiers.trees.ADTree;
import weka.classifiers.trees.J48;
import weka.core.Instances;
import weka.filters.unsupervised.attribute.Remove;
import java.io.BufferedReader;
import java.io.FileNotFoundException;
import java.io.FileReader;
import java.io.IOException;
public class main {
public static void main(String[] args) throws Exception {
Instances training_data = new Instances(new BufferedReader(
new FileReader("test_data/weather.arff")));
training_data.setClassIndex(training_data.numAttributes() - 1);
Instances testing_data = new Instances(new BufferedReader(
new FileReader("test_data/weather.arff")));
testing_data.setClassIndex(training_data.numAttributes() - 1);
String summary = training_data.toSummaryString();
int number_samples = training_data.numInstances();
int number_attributes_per_sample = training_data.numAttributes();
System.out.println("Number of attributes in model = "
+ number_attributes_per_sample);
System.out.println("Number of samples = " + number_samples);
System.out.println("Summary: " + summary);
System.out.println();
// J48 j48 = new J48();
ADTree adt = new ADTree();
Remove rm = new Remove();
rm.setAttributeIndices("1");
FilteredClassifier fc = new FilteredClassifier();
fc.setFilter(rm);
fc.setClassifier(adt);
fc.buildClassifier(training_data);
for (int i = 0; i < testing_data.numInstances(); i++) {
double pred = fc.classifyInstance(testing_data.instance(i));
System.out.print("given value: "
+ testing_data.classAttribute().value(
(int) testing_data.instance(i).classValue()));
System.out.println(". predicted value: "
+ testing_data.classAttribute().value((int) pred));
}
}
}
Here are the results:

I used the ADTree classifier on the weather.arff demo data. This is a very simple example, and I hope in the future to go into more detail about how machine learning tools like Weka can be used as part of an agent based programming approach.
http://www.markwatson.com/. Lots of good stuff in this, but the bit that really got my attention was how easy and clean the explanation was for how to embed Weka into a Java application.
If you are not familiar with Weka, I highly recommend that you go here to learn more about it: http://www.cs.waikato.ac.nz/ml/weka/
In summary, the steps to use and modify the example were as follows:
- Create a project
- Add weka.jar to the build path
- Copy and tweak the code from the example
- Examine results
Here is a screen shot of adding weka.jar to the project:

Here is the Java code (modified only slightly from the example referenced above):
import weka.classifiers.meta.FilteredClassifier;
import weka.classifiers.trees.ADTree;
import weka.classifiers.trees.J48;
import weka.core.Instances;
import weka.filters.unsupervised.attribute.Remove;
import java.io.BufferedReader;
import java.io.FileNotFoundException;
import java.io.FileReader;
import java.io.IOException;
public class main {
public static void main(String[] args) throws Exception {
Instances training_data = new Instances(new BufferedReader(
new FileReader("test_data/weather.arff")));
training_data.setClassIndex(training_data.numAttributes() - 1);
Instances testing_data = new Instances(new BufferedReader(
new FileReader("test_data/weather.arff")));
testing_data.setClassIndex(training_data.numAttributes() - 1);
String summary = training_data.toSummaryString();
int number_samples = training_data.numInstances();
int number_attributes_per_sample = training_data.numAttributes();
System.out.println("Number of attributes in model = "
+ number_attributes_per_sample);
System.out.println("Number of samples = " + number_samples);
System.out.println("Summary: " + summary);
System.out.println();
// J48 j48 = new J48();
ADTree adt = new ADTree();
Remove rm = new Remove();
rm.setAttributeIndices("1");
FilteredClassifier fc = new FilteredClassifier();
fc.setFilter(rm);
fc.setClassifier(adt);
fc.buildClassifier(training_data);
for (int i = 0; i < testing_data.numInstances(); i++) {
double pred = fc.classifyInstance(testing_data.instance(i));
System.out.print("given value: "
+ testing_data.classAttribute().value(
(int) testing_data.instance(i).classValue()));
System.out.println(". predicted value: "
+ testing_data.classAttribute().value((int) pred));
}
}
}
Here are the results:

I used the ADTree classifier on the weather.arff demo data. This is a very simple example, and I hope in the future to go into more detail about how machine learning tools like Weka can be used as part of an agent based programming approach.
Wednesday, February 9, 2011
Monday, February 7, 2011
LabVIEW Robotics Module - Rotation Matrix Example
I was able to download the evaluation of the LabVIEW 2010 Robotics Module (unfortunately not available for Mac at the time of this writing) and wrote this quick VI to demonstrate using the Angle Vector to Rotation Matrix VI and the Rotation Matrix to Angle Vector VI.

This simple VI takes an angle, in radians, by which the rotation occurs and a vector specifying the x, y, and z coordinates of the point around which to rotate.
The front panel for this VI allows the user to double check the Homogenous Transforms by using the output of one transform as the input of the other as shown below:

The rotation matrix is very important to a number of robotics operations. There is a ton that could be said about this as it relates to kinematics and the representation and manipulation of an end effector, but for now I am happy to make the VI work.
So far I have had a few issues with the examples that have come with the Robotics Module and in terms of a product for business use I have some concerns. It also appears that because I am using the evaluation version some of the implementations that I am most interested in looking at are protected. Even with these limitations, the LabVIEW 2010 Robotics Module has been very interesting to look at.
Friday, February 4, 2011
Automatically Clean Up LabVIEW Block Diagrams
http://zone.ni.com/devzone/cda/tut/p/id/7386
This is a good one. I especially like the explanation of how the clean up tool can be configured. I am interested to work with this and see if there might be a mechanism for custom style guidelines to be created and implemented for a team of developers (this is common in text based programming teams).

This is a good one. I especially like the explanation of how the clean up tool can be configured. I am interested to work with this and see if there might be a mechanism for custom style guidelines to be created and implemented for a team of developers (this is common in text based programming teams).

Thursday, February 3, 2011
Wednesday, February 2, 2011
NXT VI Hierarchy in LabVIEW
In order to get a feel for how complicated this can get:


This is what the NXT VI Hierarchy looks like. A nice demonstration of how a complete program can be created that is very modular and extensible.

This is what the NXT VI Hierarchy looks like. A nice demonstration of how a complete program can be created that is very modular and extensible.
Tuesday, February 1, 2011
Manifesto for Agile Software Development
The Manifesto for Agile Software Development can be found here:
http://agilemanifesto.org/
It states:
We are uncovering better ways of developing software by doing it and helping others do it. Through this work we have come to value:
That is, while there is value in the items on the right, we value the items on the left more.
I agree with this very much and have recently been considering how it applies to robotics. I have found a few IEEE papers discussing Agile Robot Development and hope to post some expanded thoughts on this in the future.
http://agilemanifesto.org/
It states:
We are uncovering better ways of developing software by doing it and helping others do it. Through this work we have come to value:
|
I agree with this very much and have recently been considering how it applies to robotics. I have found a few IEEE papers discussing Agile Robot Development and hope to post some expanded thoughts on this in the future.
Subscribe to:
Posts (Atom)